With Update 2.4 you can upload custom images instead of Font Awesome icons. You can create transparent PNG images with your icons and upload them by using Image option in the Event Symbol Type menu.
We suggest for best result to use images with dimensions 500x500px. You can watch demonstration video here:
4. Displaying Stachethemes Event Calendar version 5 on the Front-End
Variant 1: Using the [stec] Shortcode
Log in to your WordPress admin area.
Go to "Pages" in the admin dashboard.
Edit the page where you want to display the calendar.
Add a block that supports shortcodes.
Insert the [stec] shortcode into the block.
Save your changes and view the page on the front-end.
Variant 2: Using Gutenberg Block or Elementor Widget
Log in to your WordPress admin area.
Go to "Pages" in the admin dashboard.
Edit the page where you want to display the calendar.
If using Gutenberg:
Add a new block.
Look for the "Stachethemes" section and select the "Full Calendar" block.
If using Elementor:
Add a new section to your page.
Search for the "Full Calendar" widget under "Stachethemes" and add it to the section.
Customize the calendar settings as needed.
Save your changes and view the page on the front-end.
Choose the variant that best suits your needs - either the [stec] shortcode or the Gutenberg block/Elementor widget method.
6. Set up Weather Forecast for Stachethemes Event Calendar version 5
Set up Weather Forecast
Your Calendar plugin requires an API key from OpenWeatherMap to fetch weather data.
Users can set up this API key in the plugin settings as follows:
Go to Dashboard -> STEC -> Settings -> Forecast tab.
Select the API Version:
The calendar offers two API versions, 2.5 and 3. Here's what you need to know:
Version 3: This is the recommended version for new users. If you are a new user to OpenWeatherMap, select "Version 3" from the dropdown menu.
Version 2.5: This version is deprecated and intended for older users who might have previously used it. If you have been using the plugin with an older API key, you can select Version 2.5, but it's advisable to migrate to version 3.
Enter Your API Key:
In the "Forecast" settings tab, you will see a field labeled "API Key." This is where you should enter your OpenWeatherMap API key.
If you don't already have an account on OpenWeatherMap, go to their website at https://openweathermap.org/ and sign up for a free account. If you have an account, log in.
Generate a New API Key and place it in the Forecast settings "API Key" field.
Save Your Settings:
Once you have entered your API key and selected the appropriate API version, don't forget to save your settings.
Note: Weather Forecast is available only for events that have physical location with valid coordinates.
7. Using iCalendar RRULE Repeater Options (BETA)
THIS ARTICLE IS FOR STACHETHEMES EVENT CALENDAR VERSION 3.x !
There is undocumented feature in the repeater that is still in beta allowing you more complicated repeating options, but you can use it successfully.
Go to the event and click Set Repeater button and this popup will show up:
Now the option I will give you is quicker, but as I said undocumented yet. Click on the popup (anywhere also the form should be rested no checks or options selected) and press CTRL + ALT + SHIFT+ R and the popup will change into this:
From your Dashboard go to St. Event Calendar menu and select Tickets. Click Create Ticket and fill the information in the form.
When you are done press Create Ticket button bellow.
To add the ticket to your event simply go to Events and open your event or create new one. Go to Booking tab and select the ticket from the menu. You can add as many tickets as you want.
You can watch demonstration video:
9. Broken Font-Awesome Icons
Currently Stachethemes Event Calendar is using the latest version of Font-Awesome while many of the themes using build-in plugins like WP-Bakery or Slider Revolution are using old version.
This may sometimes can cause some icons to not be displayed. The reason for that is because in the latest version Font-Awesome renamed some of the icons and the old version can't find them anymore.
For now to fix this open your theme functions.php file and on the bottom paste this code:
If the problem persist please contact our Customer Support.
10. How to display the Box Grid view
With Update 2.4 we added a new events view called Box Grid.
You can see how to enable the view here:
11. Creating Event Coming Soon Page
Hello everyone!
With update 2.3.9 we added option for you to create coming soon page for event of your choosing.
For a start you will need to know the ID of the event you want to show in Coming Soon page. Go to St. Event Calendar, Events and scroll down and see what is the id of the Event.
This event for example have ID number 22. Now when you know the event ID go to Dashboard, Pages and Create new Page. Enter the title of the page and in the text area below enter the event ID and in the Page attributes select Template: St. Event Calendar Coming Soon Page.
And with this your coming soon page is complete. You can watch the "How to" video here:
12. Does this have ical or google cal auto sync features?
The feature is located in Dashboard -> Stachethemes Event Calendar -> Import -> Auto-import events from URL
13. How to add Event Organizer Information?
With Update 2.4 you now have the option to add the event organizer information. To do this simply go to your Dashboard -> Events, select the event you want and you will see there is a new tab "Organizers".
Add the data and click Update Event. You can watch demonstration video here:
14. Changing Filter Icon to Text
If you want to change the filter icon to just text Filter simply go to Dashboard -> STEC -> Fonts & Colors -> Custom style and place the css below:
This article will show you how to fix the most common broken layout problem with not only ours, but mostly any front-end plugin.
In this example if our plugin look like this:
Go to your Dashboard -> Pages and open the page that contain the Stachethemes Event Calendar shortcode.
Open in Text mode and see if the shortcode is wrapped in PRE tag like this:
If this is the case, remove them and update the page. If this don't fix the problem you are having please open a ticket and we will take look at it :)
Video of the steps explained can be seen here:
16. Creating Calendar
To create a calendar go to your “Dashboard” then “Stachethemes Event Calendar” and click “Calendars” from the menu. Fill Calendar Name, Color, Timezone and Visibility (public or private) and click on “Create Calendar” button.
A new calendar should appear under “List with your created calendars”.
17. Changing the Single Event Page URL from stec_event/ to event/
THIS ARTICLE IS FOR STACHETHEMES EVENT CALENDAR VERSION 3.x !
Go to Dashboard -> STEC -> General -> Tools tab.
Scroll to "Permalinks" section and under "Event single page permalink" change the value from "stec_event" to "event".
Click on the blue button "Save & refresh permalinks"
18. Activation
As of version 1.4 the plugin requires activation.
To activate the plugin go to “Dashboard” -> “STEC” -> “Activator” and paste your purchase code and click activate.
19. How to Embed Events
THIS ARTICLE IS FOR STACHETHEMES EVENT CALENDAR VERSION 3.x !
To embed event simply go to the share section of the event
And click the link icon. Small pop-up will appear containing the embed code of the event.
20. How to Open Event in External URL
With Update 2.4 now you can open event not only in Calendar and Single Page, but in External URL.
Simply go to your Dashboard -> St. Event Calendar -> General and on the bottom you will see this menu:
Select External Link and Save the Settings. Now go to your Event Introduction tab and on the bottom you will see this:
Enter your website link with http:// (or https) - (example: http://www.google.com) and Update the event.
You can see video demonstration here:
21. Adding products with WooCommerce
Here is how you can add items to sell with your events by using WooCommerce.
Go to Events.
Select Calendar.
Click Add Event or Edit Event.
Click on Shop tab
From the dropdown select the WooCommerce product you want to add to the product.
Click Add to Event
All of the products logic is handled by WooCommerce itself. We are simply linking the product to the event. You don’t write prices etc. through our plugin. When you are creating an event there is a new tab “Shop” with list of all products you have.
You can select product(s) from the list and click “Add to Event”.
On the front-end if the event has linked products, the calendar will pull from WooCommerce the product details along with buy button, short description, prices etc. On clicking the buy button the plugin sends ajax request to WooCommerce plugin and then refreshes the Cart on success.
22. Installation
Installation of Stachethemes Event Calendar is very simple.
Go to your “Dashboard” then “Plugins” click “Add New” and “Upload Plugin”.
Click “Browse”, pick the Stachethemes Event Calendar archive and Click “Install Now”.
After installation click “Activate plugin” and a new menu should appear named “STEC”.
You can watch quick video demo here:
23. Obtaining Captcha API Key
THIS ARTICLE IS FOR STACHETHEMES EVENT CALENDAR VERSION 3.x !
Copy and Paste Site and Secret Key into Stachethemes Event Calendar Captcha tab in General Settings and press “Save Settings”.
24. Creating Events
Before adding events you must have at least one calendar created otherwise the Events menu in the Dashboard will not appear!
To create an event go to your “Dashboard” go to “Stachethemes Event Calendar” and click “Events” from the menu.
Select “Calendar” from the list or create one if you haven’t created one yet. Click on “Add Event” button. Fill desired event details and click “Add Event”.
Keep in mind that most event tabs are optional. You can fill all the tabs before clicking on the “Add Event” button.
25. How to show Event Date instead of Icon
With Update 2.4 you have the option to show the Event Date instead of Icon in the Agenda List and Grid view.
To do that go to your Event General Tab and in Event Symbol Type menu select Date.
You can see video demonstration here:
26. Displaying Different Views for Desktop and Mobile Devices
This article will show you how to display two different views one for Desktop and one for Mobile device. Simply open your active theme functions.php file and at the bottom paste following code:
add_action('wp_footer', function() {
    global $post;
    if (!is_a($post, 'WP_Post') || !has_shortcode($post->post_content, 'stachethemes_ec')) {
        return;
    }
    ?>
    <script type="text/javascript">
        (function ($) {
            $(function () {
                if (typeof $.stecExtend === 'undefined') {
                    return;
                }
                // config vars
                var mobileView = 'grid';
                var normalView = 'agenda';
                $.stecExtend(function (m) {
                    m.glob.options.view = m.helper.isMobile() ? mobileView : normalView;
                });
            });
        })(window.jQuery);
    </script>
    <?php
});
To change the mobile view just edit this line: var mobileView = 'grid';
And for Desktop this one: var normalView = 'agenda';
27. How to add new Icon from Font Awesome Library
With Update 2.4 you now have the option to add more icons from Font Awesome Library.
When you open your Event General Tab you will see this interface:
The Event Symbol Type menu is set by default to Icon. On the bottom you see Add Icon from Font-Awesome section. To add new icon simply go to https://fontawesome.com/icons?d=gallery and pick Icon. The page will change for this for example:
On the bottom you see this option:
Click the Clipboard icon and go back to your Dashboard and paste it in the Icon Class Name input and click Add to the List. This will add the new icon to your library.
After you login select “I want to install Disqus on my site”
Fill the form and click “Create Site”.
The field “Website Name” is your SHORTNAME. Copy that in your clipboard. Paste it in the Stachethemes General Settings Disqus Shortname.
29. Updating
VERSION 3.0 OR NEWER
Since version 3.0 the plugin uses the default Wordpress updater. To check for update go to Dashboard -> Plugins page. If no update shows up try de-activating and re-activating the plugin.
Version 2.x
1) Go to Dashboard -> St. Event Calendar -> Updates.
2) Click “Check for updates”.
3)
If new update is available a blue button “Download & Install” will appear.
Version 1.7.2 and below
Steps to update manually:
1) First BACKUP the calendar folder ( wp-content/plugins/stachethemes_event_calendar ) !
2) Deactivate the plugin ( Do not uninstall or you will lose your events ).
3) Copy the new files to wp-content/plugins/stachethemes_event_calendar and overwrite if asked.
4) Re-activate the plugin.
That’s it.
STEPS (2) AND (4) ARE VERY IMPORTANT OTHERWISE YOUR SQL DATABASE WON’T UPDATE!
30. How to add Image instead of Icon
With Update 2.4 now you can add your custom images instead of icons. When you select Image in Event Symbol Type menu, you will have the option to add image:
If you add more than one image they will change with fade effect every 3 seconds. You can watch demonstration video here:
31. Creating Custom Tabs
Code example for adding custom tab. Place code below in your theme functions.php file
/**
 * Step 1: Creating custom tab on the front-end
 */
add_filter('stec_event_tabs', function($tabs) {
    // uses function add_event_tab($slug, $title, $icon, $content = "", $file = false)
    $tabs[] = array("my-custom-tab", __('My Custom Tab', 'stec'), "fas fa-code", "", false);
    return $tabs;
});
/**
 *  Step 2: Add the custom tab to St. Event Calendar -> Events -> Create/Edit Event form
 *  It will also include 1 text input for storing the tab content
 */
add_action('stec_admin_addedit_event_tab', function() {
    ?><li data-tab="my-custom-tab"><?php _e('My Custom Tab', 'stec'); ?></li><?php
});
add_action('stec_admin_addedit_event_tab_content', function($event) {
    $value = null;
    if ($event) {
        $value = $event->get_custom_meta('custom_input_name');
    }
    ?>
    <div class="stachethemes-admin-section-tab" data-tab="my-custom-tab">
        <p class="stachethemes-admin-info"><?php _e('Field title', 'stec'); ?></p>
        <input class="stachethemes-admin-input" type="text" name="custom_input_name" value="<?php echo $value; ?>" >
    </div>
    <?php
});
/**
 * Step 3: Store custom input content and create/edit event
 */
add_filter('stec_insert_post', function($post_data) {
    $custom_input_value = isset($_POST['custom_input_name']) ? $_POST['custom_input_name'] : null;
    if ($custom_input_value) {
        // if custom value is found, add it to the post meta data
        $post_data['meta_input']['custom_input_name'] = $custom_input_value;
    }
    return $post_data;
});
/**
 * Step 4: Retrieve the tab content when query the event front data
 * */
add_filter('stec_event_get_front_data', function($data) {
    $value = get_post_meta($data['id'], 'custom_input_name', true);
    if ($value) {
        $data['custom_input_name'] = $value;
    }
    return $data;
});
/**
 * Step 5: Display the tab content via Javascript
 */
add_action('wp_head', function() {
    ?>
    <script type="text/javascript">
        (function ($) {
            $(function () {
                // Calendar
                $(document).on('onEventToggleOpen', function (e, data) {
                    data.$instance.find('.stec-layout-event-inner-my-custom-tab').html(data.event.custom_input_name);
                });
                // Single Page
                if ($('.stec-layout-single').length > 0) {
                    $('.stec-layout-single-my-custom-tab').html(stecSingleEvent.custom_input_name);
                }
            });
        })(jQuery);
    </script>
    <?php
});
32. Using Theme Feature
With Update 2.4 now you can Import and Export color themes. You can now create your calendar layout color theme and export it to import it later or use it somewhere else. You can also download our premade themes from our theme feature website: http://stachethemes.com/colorthemes/
You can watch demonstration video here:
33. Adding custom fields to the RSVP form code example
THIS ARTICLE IS FOR STACHETHEMES EVENT CALENDAR VERSION 3.x !
Here's example on how to insert custom fields to the RSVP form.
The code should be inserted in your theme or child-theme functions.php file.
/**
 * This code adds two custom fields (text input and select element) on the front-end modal window
 */
add_action('wp_footer', function() {
    ?>
    <script type="text/javascript">
        (function ($) {
            $(document).on('stecOnRsvpAfterFields', function (e, data) {
                var customHtml = [
                    '<input type="text" name="attendee_country" placeholder="Country" />',
                    '<select name="attendee_tag"><option value="1">Tag</option></select>'
                ];
                data.temp.customFields = customHtml;
            });
        })(window.jQuery);
    </script>
    <?php
});
/**
 * This code intercepts the custom fields when the form is submitted
 * \Stachethemes\Stec\Admin_Helper::post is same as $_POST[...] but returns default value (false) if !isset
 */
add_filter('stec_rsvp_to_event_before_add', function(\Stachethemes\Stec\Event_Meta_Attendee $attendee) {

    $country = \Stachethemes\Stec\Admin_Helper::post('attendee_country', false);
    $tag     = \Stachethemes\Stec\Admin_Helper::post('attendee_tag', false);
    if ($country && $tag) {
        $attendee->set_custom_data('country', $country);
        $attendee->set_custom_data('tag', $tag);
    }
    return $attendee;
});
/**
 * This code will display the customs fields in the admin area
 * When clicking on attendee edit button
 */
add_action('admin_footer', function() {
    ?>
    <script type="text/javascript">
        (function ($) {
            $(document).on('stecOnAdminAddAttendee', function (e, data) {
                var attendeeIndex = data.$attendee.index('.stachethemes-admin-attendance-list-attendee');
                $.each(data.attendee.custom, function (key) {
                    var customHTML = [];
                    var inputKeyName = 'attendee[' + attendeeIndex + '][custom][' + key + ']';
                    customHTML.push('<p class="stachethemes-admin-info">' + key + '</p>');
                    customHTML.push('<input class="stachethemes-admin-input" type="text" name="' + inputKeyName + '" value="' + this + '" />');
                    $(customHTML.join('')).insertBefore(data.$attendee.find('.edit a[data-action="update-attendee"]'));
                });
            });
        })(window.jQuery);
    </script>
    <?php
});
34. Extending event preview
Javascript example on how to modify the event preview html.
The code should be placed in the active theme functions.php file.
This example replaces all preview html with simple title:
// Replaces default preview html with the modified one data.temp.EventPreviewHtml = $eventPreview.get(0).outerHTML; }); }); }); })(window.jQuery); </script> <?php });
35. Stachethemes Event Calendar 5 Dynamic Date Values
Date filters accept static date or a dynamic date value
Static date
Any date in format YYYY-MM-DD e.g. 2024-12-31
or YYYY-MM-DDTHH:mm e.g. 2024-12-31T15:30
Dynamic dates list
2_years_ago: 2 years ago from now
2_years_ahead: 2 years ahead from now
1_year_ago: 1 year ago from now
1_year_ahead: 1 year ahead from now
6_months_ago: 6 months ago
6_months_ahead: 6 months ahead from now
3_months_ago: 3 months ago
3_months_ahead: 3 months ahead from now
end_of_next_month: End of next month
start_of_next_month: Start of next month
end_of_prev_month: End of previous month
start_of_prev_month: Start of previous month
end_of_this_month: End of current month
start_of_this_month: Start of current month
end_of_next_week: End of next week
start_of_next_week: Start of next week
end_of_prev_week: End of previous week
start_of_prev_week: Start of previous week
end_of_this_week: End of current week
start_of_this_week: Start of current week
end_of_today: End of today
start_of_today: Start of today
end_of_today: End of today
now: Now
start_of_this_year: Start of the current year
end_of_this_year: End of the current year
start_of_the_prev_year: Start of the previous year
This example inserts two new inputs: Phone Number and Company Name.
The example assumes the code will be placed in the theme or the child-theme functions.php file.
/**
 * STEP 1:
 * Modify the Attendance Form Structure on the Front-end
 * via stecFilterAttendFormContent JavaScript filter
 */
add_action('wp_footer', function () {
?>
    <script>
        window.stecFilterAttendFormContent = function({
            structure,
            attendanceData,
            isLoggedIn
        }) {
            const newStructure = JSON.parse(JSON.stringify(structure));
            // Insert Phone Number input field
            newStructure.push({
                id: 'phone-number',
                title: 'Phone number',
                type: 'input-text',
                metaKey: 'phone_number',
                value: attendanceData?.current_user?.phone_number || '',
                required: true,
                regexByType: 'phone',
                errorMessage: 'Invalid phone number'
            });
            // Insert Company Name input field
            newStructure.push({
                id: 'company-name',
                title: 'Company name',
                type: 'input-text',
                metaKey: 'company_name',
                value: attendanceData?.current_user?.company_name || '',
                required: true,
                regexByType: 'title',
                errorMessage: 'Invalid company name'
            });
            return newStructure;
        }
    </script>
<?php
});
/**
 * STEP 2:
 * Register the new custom input fields as a post meta
 * so that it can be saved in the database when the user submits the RSVP form
 */
add_action('init', function () {
    register_post_meta(
        'stec_attend',
        'phone_number',
        array(
            'type'          => 'string',
            'single'        => true,
            'show_in_rest'  => true
        )
    );
    register_post_meta(
        'stec_attend',
        'company_name',
        array(
            'type'          => 'string',
            'single'        => true,
            'show_in_rest'  => true
        )
    );
});
/**
 * STEP 3:
 * Include the new custom input fields from the database when
 * the attendance data for the event is being retrieved on the front-end
 */
add_filter('stec_attendance_data_meta_fields', function ($fields) {
    $fields[] = 'phone_number';
    $fields[] = 'company_name';
    return $fields;
});
/**
 * STEP 4:
 * Modify the Attendance Form Structure on the Admin via stecFilterAttendFormContentAdmin JavaScript filter
 * to include the new custom checkbox field
 *
 * This is similar as STEP 1 but for the Admin panel
 */
add_action('admin_footer', 'stec_attendance_custom_form_admin');
add_action('wp_footer', 'stec_attendance_custom_form_admin');
function stec_attendance_custom_form_admin() {
?>
    <script>
        window.stecFilterAttendFormContentAdmin = function({
            structure,
            postData
        }) {
            const newStructure = JSON.parse(JSON.stringify(structure));
            newStructure.push({
                id: 'phone-number',
                title: 'Phone number',
                type: 'input-text',
                metaKey: 'phone_number',
                value: postData.current?.meta?.phone_number || '',
                regexByType: 'phone',
                required: true,
                errorMessage: 'Invalid phone number'
            });
            newStructure.push({
                id: 'company-name',
                title: 'Company Name',
                type: 'input-text',
                metaKey: 'company_name',
                value: postData.current?.meta?.company_name || '',
                regexByType: 'title',
                required: true,
                errorMessage: 'Invalid company name'
            });
            return newStructure;
        }
    </script>
<?php
}
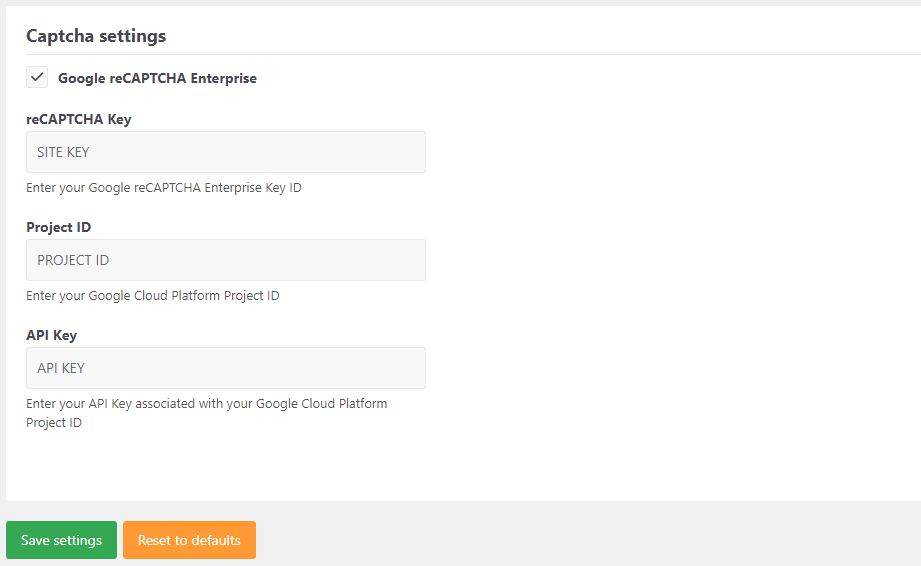
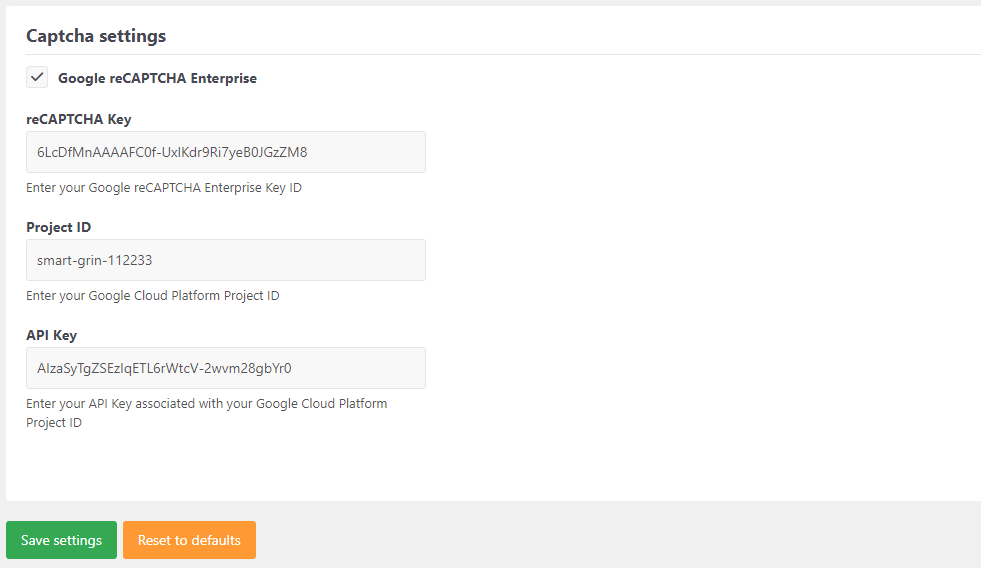
37. Set up Google Captcha Enterprise for Stachethemes Event Calendar version 5
To enable Google Captcha Enterprise for your calendar, go to Dashboard -> STEC -> Settings -> Captcha:
Obtaining the reCAPTCHA Key, Project ID and API Key values
Otherwise, the plugin will not load your translation.
For translation tool, we recommend the Loco Translate plugin.
The translation folder contains some pre-built language packs using Google Translation AI which can serve as a starting point.
After you have set up your .po file go to Dashboard -> Stec -> Settings -> Language and check "Enable i18n data loader":
Do not enable "Enable multilingual support" unless you have WPML or POLYLANG plugins enabled.
How to translate the calendar using the Loco Translate plugin:
1. Go to Dashboard -> Loco Translate -> Plugins
2. Click on "Stachethemes Event Calendar"
3. If you want to use some of the pre-built language packs, for example Polish, hover over "Polish" and move it to the system folder by clicking "Move":
Then select "System" as new location:
And click "Move files" button below.
Click "Edit" to start translating:
---
If you want to create new .po file click on "+ New Language":
It is important the language files location to be set to "System".
4. Before starting translating/editing the .po file click "Sync":
5. You can now start translating. Click "Save" after you are done.
6. Go to Dashboard -> STEC -> Settings -> Language and check "Enable i18n data loader" and click "Save Settings".
Reload the page and that's all.
39. Translating the event template (Version 5)
The event template cannot be translated via a gettext editor (e.g. Loco Translate).
Update: Since version 5.1.9 Default Templates can be translated using Loco Translate or similar tool.
To translate the content, you will have to create your own event template via the builder.
1) Go to your Calendar Dashboard -> Builder -> Click the "Add template" button.
2) Select "Event layout" and leave "Blank template" unchecked to start with a prebuilt template.
3) Click the "Content Tabs" element to select it. Then, click on the cogwheel icon to access the settings.
4) On the left panel, you will find the Content Tabs settings, displaying each tab and its respective label.
You can assign an icon and label for each tab from that section.
5) After you have finished setting the labels, click "Save" in the top right corner and provide a name for your template.
6) Once you have saved your template, return to the Calendar Dashboard, then navigate to the Settings and select the Builder tab.
In the "Event template" input, choose the template you've just created.
open_events_in - (optional) Open events in same window or new window. Values: _self, _blank
Display Dashboard on the Front-end Shortcode:
[stec_dashboard]
Display Specific Event Tickets
[stec_event_tickets]
Shortcode parameters:
event_id - (required) The event id
date - (optional) Repeat date occurrence. Format: YYYY-MM-DDTHH:mm
mode - (optional) "modal" mode displays the event tickets list in a popup when the button is pressed, while "static" mode directly opens the container on the page
button_text - (optional) Text for the button that opens the modal window
custom_button - (optional) Custom button class name if you want to style your own button
Insert your API Token in your WordPress Font-Awesome Plugin
42. Removing the event countdown element using the Builder (v5)
1) From the Calendar Dashboard click on "Add template" button in the Builder block
2) Select template type:
Keep "Blank template" unchecked to start editing with the default elements already inserted.
3) Click on the "Event Counter" element to select it.
4) Press the "Delete" button or click on the trash icon to delete the element.
5) Adjust the "Media Carousel" element's top margin by clicking on "Media Carousel" element:
Click on the cogwheel button to enter properties menu:
In "Properties" set top margin to 0
6) Click "Save" to save the template:
7) You need to tell the Calendar to use this template now. Go to Calendar Dashboard -> Settings -> Builder tab
Change "Event template" field value to the template you've just created:
Save the settings.
43. How to Add Event Images to Yoast SEO in Stachethemes Event Calendar Version 5
To tell Yoast Seo to use the event image for it's og:image meta place the following hook in your child-theme functions.php file:
/**
 * OG:Image filter for Yoast SEO plugin
 * Adds first image from event to Yoast SEO Open Graph Image
 * Works only for single event pages
 */
add_filter('wpseo_add_opengraph_images', function ($image_container) {
    if (get_post_type() === 'stec_event') {
        $images = get_post_meta(get_the_ID(), 'images');
        if (is_array($images) && $images) {
            $image = array_shift($images);
            $image_container->add_image_by_id( $image['id'] );
        }
    }
    return $image_container;
});
44. Version 5 Permission Settings
Permission Settings
Permission settings adjust which user roles can create terms ( calendars, categories, locations, organizers, guests ) and events.
Default settings allow only users with Administrator role to create/edit terms and events.
To change these settings navigate to Calendar Dashboard -> Settings -> Dashboard tab
Access Dashboard - Determines the users authorized to access the calendar dashboard.
The dashboard shows only the options permitted for each user.
If a user can access the dashboard but lacks the ability to manage terms, the corresponding option will not be visible on the dashboard.
By default, all logged-in users can access the dashboard to view reminders, attendances, and ticket orders if the front-end dashboard option is enabled.
Manage terms - Specifies the users with the ability to create and edit new terms. Users cannot edit terms created by other users unless they have additional permissions granted by the term author.
For example when creating a new calendar term the user has option to set "Edit permission"
By default, this value is set to "Private," signifying that only the calendar author can edit it. Other users, even if permitted to "Manage terms," cannot edit this calendar.
Exception: Super admins can see and edit everything.
Manage events - Specifies the users with the ability to create and edit events.
When creating an event, users can choose which user roles are permitted to edit it.
Similar to term rules, the same principles apply to events.
By default, only the event author can manage their own events. Even if a user has the authority to manage events, they cannot edit events created by other users without permission.
Import settings - Specifies the users authorized to use the import settings and cron jobs in the Calendar Dashboard.
Enforce private admin
When these options are selected, the calendar will enforce private mode for both terms and events.
This implies that only the authors can manage or view (when private front-end is enabled) their items.
All Edit Permissions, Use Permissions, and Read Permissions (when private front-end is enforced) settings will be removed, and items will be automatically assigned to private.
45. Activating Stachethemes Event Calendar version 5
To activate your calendar go to Dashboard -> STEC -> Activator -> Manage License
If you receive this message, it means the server is unable to connect to our server. This could be due to misconfiguration, firewall restrictions, and various other issues. In such a case, you can attempt to activate your calendar remotely from our website:
46. Stachethemes Event Calendar version 5 Shortcode Parameters
Calendar Shortcode Parameters
Please note that the parameters are also available in the calendar dashboard. You can access the calendar dashboard to configure and customize various settings to meet your specific needs and preferences. Here are some of the available parameters:
Calendar shortcode: [stec] or [stachethemes_ec]
Gutenberg block: /stec or click "Browse all" and navigate to the "Stachethemes" section.
Elementor widget: The calendar widgets are available under "Stachethemes" section or in "Search widget" input type "stec"
calendar__layouts - Available layout switch buttons in the top menu Values: agenda, month, week, grid, boxgrid, map
calendar__dow - First day of the week (0 – 6) Values: Numeric value representing the day of the week (0 – Sunday, 1 – Monday, …, 6 – Saturday)
calendar__use_user_timezone - Display the events dates in user timezone ( true / false )
calendar__show_tz_offset - Show timezone abbreviation Values: true (on), false (off)
calendar__date_format - Date format Values: "stec_dmy" (day-month-year), "stec_mdy" (month-day-year), "stec_ymd" (year-month-day), "wp" (WordPress default)
calendar__time_format - Time format Values: "stec_12" (12-hour format), "stec_24" (24-hour format), "wp" (WordPress default)
calendar__top_enabled - Display calendar top menu ( true / false )
calendar__top_today_button - Show today button in the top bar Values: true (on), false (off)
calendar__top_nav_buttons - Show navigation buttons in the top bar Values: true (on), false (off)
calendar__top_datepicker_menu - Show datepicker menu in the top bar Values: true (on), false (off))
calendar__top_search_menu - Show search menu in the top bar Values: true (on), false (off)
calendar__top_filters_menu - Show filters menu in the top bar Values: 0 (off), 1 (toggle), 2 (static)
calendar__top_layouts_menu - Show layouts menu in the top bar Values: true (on), false (off)
calendar__top_inline_categories - Display categories inline below the top menu ( true / false )
calendar__top_categories_start_inactive - Uncheck all categories by default ( true / false )
calendar__open_events_in - Open events in Values: "calendar" (within the calendar view), "modal" (in a modal window), "single" (in a single event view), "external" (in an external link)